picture of oregano

An annual herb for all seasons

My earliest food memory of oregano is the musty scent of over-seasoned marinara sauce.

Like too much salt, too much oregano can ruin a dish; for a while, maybe ruin your appetite for marinara-based dishes.

When I was in my 20s, my faith in oregano was restored at an marvelous restaurant in a suburb of Birmingham, Alabama. At least back then, Nabeel’s made magic with oregano in baked seafood and souvlaki.

In my own kitchen, I still tend to over-season with oregano. Nevertheless, Origanum is the ruling genus of my herb garden. And here’s why.

Various aromatic species of oregano can flourish in the quasi-Mediterranean microclimate of our deck, less than a full step away from the kitchen. This area is fully exposed to sun and protected by the eaves from late summer rains.

After oregano seedlings are well established, the less I nurture them, the better. The plants grow prolifically enough for me to allow them to flower, feeding local bees, while snipping enough new leaves to dry for winter meals.

Unlike the delicate species planted on our deck, common oregano (wild marjoram) grows into a perennial bush in our Anchorage garden.

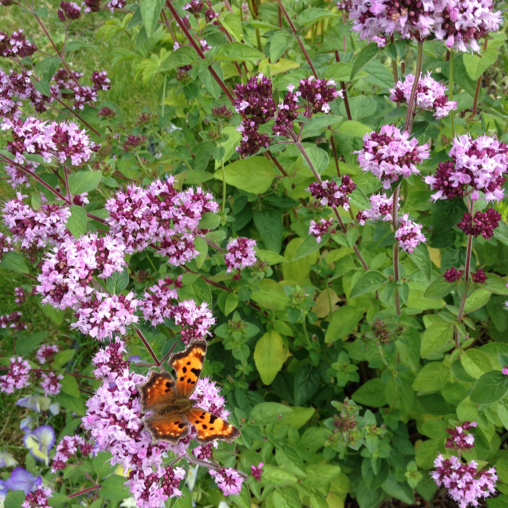
Most oregano species, subspecies and hybrids don’t overwinter reliably in an Anchorage garden. In contrast, O. vulgare (common oregano or wild marjoram) grows back in local, unamended dirt with brio, developing huge spreads of flowers that attract almost as many bees as the raspberry canes. That’s a lot of bees!

In recent years, my preferences among various oregano species, subspecies and hybrids has flipped around. One year, thanks to Deborah Madison’s Vegetable Literacy, I only wanted to grow the more finicky marjoram (it’s currently placed in the Origanum genus). I planted it anywhere a spot of dirt was available.

I still overplant marjoram. I rarely use all of it fresh, so I dry the rest to replace oregano in dishes that benefit from a more delicate, flowery note. (Note: The culinary snobs who refuse to use dried marjoram are missing out.)

Additionally, I plant Italian and Greek oregano in the spring, treating them as annuals. Occasionally, they come back, but weakly. I also plant at least one ornamental oregano every year. Dittany of Crete is a sweet, fuzzy little medicinal/ornamental plant that fits well in a hanging basket or deck planter. Many thanks to Cathy Sage for ordering a bunch of Dittany starts for the Anchorage Botanical Garden’s Herb Study Group a couple years ago.

If we had a longer growing season, these oregano “roses” would grow to look more like hops.

I’ve also tried Kirigami and Kent Beauty ornamental oregano, but my latest favorite is the hybrid Barbara Tingey, discovered by chance last spring at a local nursery.

This summer, for the first time, I preserved oregano – the Barbara Tingey – for indoor floral arrangements. (Actually, what happened is I put the flowering stalks in vases, and they dried up beautifully with zero attention!)

If any of this has inspired you to learn more about oregano, it just so happens that I gave a really nerdy talk on the subject in Spring 2018 to the Herb Study Group. At the time, I worked hard on this “fact sheet” which outlines the various major species, hybrids, and subspecies–culinary, ornamental and medicinal.

One of the favorite fact sheet items: the name of the genus is thought to originate from Greek words that mean “joy of the mountains.”

One day, I hope to roll around joyfully on a Mediterranean hill covered in wild oregano (avoiding protruding rocks, perhaps). But in the meantime, I’m trying to appreciate the intensely aromatic plants in my own part of the world.

And that’s a blog post for another day ….

For all who’ve faithfully read to the end of this post, here is your reward: a still-accurate list of favorite culinary uses for oregano and marjoram.

Zucchini – the road less traveled

Zucchini and yellow squash were my least favorite vegetables during childhood and occasionally I still find them revolting.

It might seem odd then, that I grow so much summer squash. Striped Cocozelle zucchini is an annual fixture in the garden, as is tromboncino squash, an vining Italian variety that can produce arm-length specimens that ripen into winter squash if you let them.

This year, a friend gave me a seedling for an über zucchini, Costata Romanesco, yet another Italian import. I’m dubbing the plant “Andre the Giant” because it dwarfs all of the Cocozelle plants in the garden and yet produces huge and tender fruit.

Of course, I don’t grow vegetables just to be amused by them. They need to provide for the table.

While I still haven’t made my peace with yellow squash or spaghetti squash (due entirely to the “baby food” flavor and texture of most pan-fried or baked summer squash), I’ve grown zucchini for at least 11 years.

Most of that time, I’ve sliced it into thin coins for quick pickles or, more often, grated it and froze it for future quick bread and gratins. Heck, I still have four Ziploc bags of last year’s grated zucchini in the freezer. Fortunately for our waistlines, however, I’ve discovered better uses.

The first discovery was “zucchini carpaccio” – in which fresh, raw zucchini is sliced into paper-thin coins and sprinkled lightly with olive oil, lemon juice, good Parmesan, and thin shreds of mint. A Norwegian friend found the recipe in one of the final print editions of Gourmet, and we feasted on it multiple times during one epicurean summer (This recipe seems to have disappeared from the Internet, but I’ve told you all you need to know).

In general, my “texture” issues with zucchini can be overcome with wafer-thin slabs or diced zucchini tossed raw in a salad or cooked as briefly as possible – preferably over a grill. My preference is to grill very thin slabs and toss them into dishes, especially this one featuring fresh herbs, lemon, and goat cheese. This recipe, by the way, is very helpful if you have large amounts of mint and basil that need regular trimming.

This year, I’ve also begun to “dry fry” zucchini in a pan without oil. It seems to limit the “mush” factor that is hard to avoid when you need to sauté a large amount of summer squash for a pasta dish. In fact, I’m planning to try dry frying zucchini this year with a few main course recipes that previously failed the test due to the “mush” factor.

My most recent experiment (last night) was zucchini gazpacho, in which I blended up raw zucchini, cucumbers, mint, chives, chickpeas, red wine vinegar, olive oil, chilled water, garlic, and a bit of salt and pepper. That was a low-carb masterpiece!

Here are a few other favorites:

Zucchini Hummus (2 cups of diced zucchini, 2-3 large cloves of garlic, 1/2 cup of tahini, juice from one lemon, 2 tsp. cumin, and a pinch of salt. Blend till smooth and refrigerate.) This is another recipe that has disappeared from the Internet.

Corn Sweet Onion and Zucchini Saute with Fresh Mint

Zucchini Pickles

Note: A lot of people complain that their zucchini fruit rot on the vine. Usually this is due to lack of pollination. If you have no male flowers, your female flowers will not swell up and grow up. However, you can still eat them as delicious “micro” zucchini. If you have only a few male zucchini flowers, I recommend hand pollinating your female flowers using the following technique that I’ve filmed and posted on YouTube.

I hope I don’t have to explain the technique any further …

Rhubarb cake

Savoring the ‘barb

*** Updated 6/19/19 with recipe contributions from readers … plus a favorite recipe that I forgot to include!

Michael Pollan has seven words for eating: “Eat food, not too much, mostly plants.”

I wish I could come up with only seven words for eating rhubarb. I need 12: “Eat rhubarb, mostly with sugar and butter, not too much of either.”

It’s almost a competition (with myself): Find a rhubarb dish that provides a delightful amount of tang and adequate amount of sweetness. (Hint: The roasted rhubarb recipes are the ones that really deliver.)

Finding that balance requires copious rhubarb for weekend experimentation. Ironically, we are getting our biggest harvest this year in a spot where I tried to eradicate rhubarb several years ago.

I had made the painful decision to dig up rhubarb plants in a raised bed where they were languishing. I set the divisions in pots to give away or replant elsewhere (I finally gave away the last of those pots this year) and dug a new hole (into which I may have dropped a frozen fish carcass) and set down a tiny Romeo bush cherry, planning for it to fill out the bed as years go by.

Rhubarb leaves
Giant rhubarb stems next to my original rhubarb raised bed for scale …

Fast forward to the year after eradication: the rhubarb came back somewhat vigorously, to the right of the cherry bush. This year, the rhubarb is encroaching on the cherry bush, just as it attempts to set its first bumper crop. Until now I’ve never grown rhubarb with leaves as big as a king-sized pillowcase. And I’ve been trying ….

Selfie with rhubarb leaf
Rhubarb much bigger than my head.
Rhubarb cake
My take on a buttery rhubarb and spruce tip cake featured in the Juneau Empire. I added rose-scented geranium sugar and left out the lemon zest.

So far this year I’ve used our unexpected rhubarb bounty to make two new rhubarb recipes, one old favorite recipe, and an okay recipe for rhubarb chutney (I prefer it chunkier). This rhubarb-spruce tip cake recipe from a creative and talented Juneau Empire writer/blogger was a huge hit (I think mine looks better than hers, to be honest). The rhubarb-lentil dish was appalling (not sure what I did wrong). I also made my old favorite rhubarb-rosewater syrup, which is perfect in beverages or poured over ice cream.

I can’t wait for an occasion to make this upside-down cake from Saveur which I’ll warn you will fall short of expectations if you don’t watch for a perfect amount of caramelization. I’ll probably also make this very simple rhubarb jam, which is just as delicious as the fancier rhubarb-ginger or rhubarb-rosemary jams.

I may also try to find a good rhubarb pickle recipe and churn out a few rhubarb galettes – the latter with the frozen puff pastry from the grocery store and long stems of rhubarb sprinkled with whatever spices strike a chord (ginger, cardamom?) and a little sugar. No recipe required.

The last few years, we’ve mostly eschewed rhubarb pie due to a growing aversion to sugar-heavy desserts. Though … we wouldn’t turn down rhubarb pie if it magically appeared in front of us!

If you have a favorite rhubarb recipe you’d like to share, you are very welcome to share it in the comments.

Updated material below ….

Here are a few recipes readers have contributed off-line that sound amazing:

* Rhubarb Muffins: Kate says the buttermilk makes them especially great. She usually increases the rhubarb and adds fresh ginger.

* Rhubarbecue: Boneless country ribs with rhubarb BBQ sauce?!?

* From Barbara: “I like to steam juice rhubarb in large quantities While the juice is cooling down, I mix with honey and cinnamon. This is excellent to drink, or make soda by adding yogurt whey to the cooled juice and leaving it on the countertop in a bottle with a bale for a few days. The juice is also excellent for making sorbet! The hot steamed juice can be canned into whatever size jars for future use. I also like to thinly slice fresh rhubarb to go into garden salads.”

Sausage with Chard and Rhubarb: Another recommendation from Kate that we will try this summer.

Lastly, I should mention that I left out one of my favorite rhubarb recipes of all time. It’s too special to make often. Rhubarb, Rose and Cardamom Jam (Diane Henry)

Garden plans

Gardening with a little help from Excel

Every year I get out my pencil and draw a garden plan for my raised beds that provides for rotation of plants like potatoes, broccoli, cabbage, and kale.

Crop rotation is no easy task when you have limited space, and so I don’t worry too much about rotating lettuce, squash, or tomatoes. At least in Alaska, these plants don’t seem to be as prone to diseases or pests that build up in the soil over multiple seasons.

Low tunnel raised bed
I use a (very) flexible soaker hose and plastic IRT mulch in my low tunnel, where I usually plant tomatoes, squash, and cucumbers, with minimal rotation.

As I mentioned in a previous post, I experimented with an Excel version of my garden layout this year. I saved the spreadsheet in my iCloud Drive and printed a paper copy so I could consult it anytime, anywhere – on my phone, my iPad, etc.

I am really pleased with the spreadsheet so far, for several reasons.

First of all, I always change my plans around a bit in the midst of planting. This year, for the first time ever, I’ve gone back and fixed my spreadsheet to reflect what I actually did, reprinted it, et voilà!

Even better, I didn’t need to worry about getting dirt, water, and illegible scribbles on my garden plan that will make it indecipherable in later years. (After carrying my old garden plans out in the garden for years, it’s getting hard to read them. I’ll probably need to trace over them and scan if I want to preserve them.)

I should mention that before I started experimenting in Excel, I did look around online for a customizable garden spreadsheet that could be downloaded for free. In 15-20 minutes, I didn’t find one that met my basic parameters … at least not for free.

The purpose of this post is to share my spreadsheet (for free and without copyright permissions required) with the disclaimer that it requires very minor spreadsheet skills. I customized this sheet with square grids to mimic the actual footage of my raised beds. I created circles and rectangles for various plants and planting schemes, based on individual plant spacing needs. I didn’t spend a lot of time on this spreadsheet, which is partly why I don’t need or want attributions. I believe that others can improve greatly on the spreadsheet – if you do so, please consider sharing your layout, too!

NOTE: I make no claims that the spacing I provided is fully adequate to the needs of my plants. For example, even though I gave my cucumbers in the low tunnel a running head start by planting them first, they will get shadowed by squash and tomato vines. This situation will only be rectified by building a new low tunnel dedicated to cucumbers 😉

I hope this spreadsheet is helpful to at least one reader, maybe in a future planting season, because … holy cow … it’s June already!

The cruelty of May gardening

With apologies to T.S. Eliot, I’ll posit that the most cruelest month for Alaska gardeners is May for the following reasons:

  • It’s inevitable that the wellbeing of tiny seedlings is sacrificed in the rush to prepare for planting outdoors.
  • The speculative garden projects recorded in a garden journal from the lazy comfort of a couch in December evaporate due to springtime commitments to family, friends, and community.
  • Mistakes are made, as experimental seeds (ahem, I’m looking at you, Snake Gourd, Lagenaria siceraria) and the most reliable ones (my oldest brassica seeds seem to have finally aged out) refuse to germinate.
Snake gourd seeds from Monticello failed to germinate! Hmm, more research needed (when I have time) ……

I was lucky this year that my seedlings flourished despite periods of benign neglect. A few tomato and pepper plants suffered minor leaf edema due to water stress. However they developed strong root systems and relatively sturdy stems.

In the daytime, a shaded area of my greenhouse is now covered in bitter greens (radicchio and chicory) and other vegetable seedlings. Peppers, tomatoes and mint wordlessly beg me to plant them. For now I’m just giving them bigger pots. I bring all of my vegetable seedlings into the kitchen at night because I don’t want to expose them to temperatures in the 30s. I suspect some of them might otherwise bolt early.

Another way I was lucky is that I received my first-ever soil sample results from Brookside Laboratories of Ohio yesterday, giving me enough time to prepare my raised beds before it’s time to start planting my seedlings. I reviewed the results from three soil tests and it looks like all of my vegetable beds are doing well. How boring! Once again, routine inputs of nitrogen, phosphate and potassium should do the trick this year. I didn’t even need to consult a specialist for organic fertilizer recommendations, thanks to this handy interactive spreadsheet from the University of Alaska Fairbanks Cooperative Extension Service.

Back to the theme of cruelty, I won’t be able to join a number of gardening-related events and activities in May due to scheduling conflicts. One of these is the annual seedling exchange of the Alaska Permaculture Guild, which I’ve never missed before. I’m still not sure what to do now with all my spare tomatoes and pepper seedlings, LOL. I’ve always been able to trade them for interesting new plants at this seedling exchange.

I’m also attaching a PDF of this summer’s schedule for Alaska Native Plant Society field trips, which are a great way to learn about native plants – edible, medicinal, poisonous, etc. — from local amateurs and professionals while enjoying the Alaska outdoors. You can also follow and/or like the society on Facebook to get notifications of hikes that aren’t in the published schedule. It costs only $15 per year to join the group.

I’m looking forward to June, when the seedlings go into the garden soil and slow down their growth a bit. Hmm, maybe in June I can reengage on some of those speculative garden projects!

It’s official! I’m a Master Gardener

For years I wanted to take the Master Gardener course.

At first I was motivated to learn some basic botany that I lacked. It’s nice to be able to say, confidently … well, that’s a stamen, there’s a pistil, and these are the sepals.

When I finally took the class last year, my motivations had shifted. I still needed to fill in some knowledge gaps, but I was also motivated by gratitude. Since moving to Anchorage in 2006, I’d learned plenty from gardeners around Alaska – many of them Master Gardeners – who were generous with their time and everything they’d learned over decades.

I finished the Master Gardener course in early December while my life was changing in some dramatic ways. At first I wasn’t sure how I would meet the requirement to provide 40 hours of community service. Eventually, I realized that I had all the raw materials and the ideas to put together a website/blog, plus the makings of a decent readership thanks to all of my contacts in the gardening community.

That’s how Transcendental Gardening got started, and while I haven’t broken any blogging records, the feedback on this site has been gratifying. Since March, I’ve had more than 400 visitors and more than 1,300 views on various posts and pages. They’ve spiked most often when friends have reposted them.

Today I received my certificate of completion of the Master Gardener course in the mail.

Master Gardener Certificate
Yay!

Receiving my certificate was pretty exciting, even though it doesn’t make me an expert, or any more masterful than a few local green thumbs I’ve met who haven’t sat through an official course.

I want to thank my course instructor, Mat-Su/Copper River District Extension Agent Steve Brown, and Gina Dionne, project assistant at the Cooperative Extension Service’s Anchorage Outreach Center, for supporting my use of this space to fulfill my course requirement.

I won’t stop posting here just because I met my requirements. I hope to keep posting about once a week, at least through the end of 2019.

Happy gardening!